A kitchen remodel doesn’t have to mean ripping out cabinets and starting from scratch. Whether you’re working with a modest budget or have room to splurge, 2026 offers smart ways to refresh this hardest-working room in your home. From swapping hardware to reimagining your layout, the best kitchen improvements balance aesthetics with real-world functionality. This guide walks you through ideas that deliver genuine impact without requiring a contractor’s license.
Table of Contents
ToggleKey Takeaways
- Kitchen hardware swaps and cabinet refinishing deliver maximum visual impact for $50–$400, making them ideal budget-friendly starting points for a kitchen remodel.
- Optimizing your kitchen work triangle—the distance between refrigerator, sink, and stove—eliminates daily frustration and improves workflow even without major renovations.
- Under-cabinet LED lighting and backsplash updates transform aesthetics for $300–$400 combined, offering visible impact without structural changes.
- 2026 kitchen design trends favor matte finishes, accent colors like forest green or navy on islands, and natural textures like wood tones that add warmth and authenticity.
- Pull-out shelves, drawer dividers, and tiered corner storage maximize space without replacing cabinets, solving storage issues for $50–$150 per solution.
- A phased remodel approach tackles your biggest pain point first—whether outdated finishes, poor layout, or storage—then layers in cosmetic updates to spread costs over time.
Budget-Friendly Upgrades That Maximize Impact
Cabinet Refinishing and Hardware Swaps
Don’t underestimate what new knobs and pulls can do. Cabinet hardware is one of the fastest, cheapest ways to shift your kitchen’s entire personality. Swap dated brass for matte black, or go brushed stainless steel, a set of 30-40 pulls typically runs $50–$150 depending on quality. This is a straightforward project: measure the hole spacing (usually 3 inches or 96 mm center-to-center on modern hardware), drill new holes if needed, and secure with the screws provided.
If your cabinet boxes are solid but the finish is tired, refinishing beats replacement. Sand doors and drawer fronts with 120-grit sandpaper, prime with a bonding primer (crucial, it helps paint stick to glossy surfaces), then apply two coats of cabinet-grade paint or stain. Cabinet-specific paints like those with polyurethane finish hold up better than wall paint under daily wear. This project takes a weekend for a standard kitchen and costs $200–$400 in materials. The key is surface prep: skim any dents with wood filler, sand everything smooth, and wipe down dust before priming.
Smart Lighting and Backsplash Updates
Lighting shapes how your kitchen feels and functions. Swap out a flat flush-mount fixture for pendant lights over the island or under-cabinet LED strips. Under-cabinet lighting illuminates your countertop workspace and costs $30–$100 for a plug-in kit, no hardwiring required if you route the cord behind baseboards. For a more polished look, hardwired LEDs run $100–$300 installed by a licensed electrician (recommended for anything beyond simple plug-in strips).
A new backsplash transforms the visual anchor of your kitchen without major structural work. Subway tiles remain timeless ($1–$3 per tile), or consider larger format tiles, peel-and-stick backsplash sheets, or even shiplap for a cottage feel. If you’re retiling, remove the old backsplash carefully, repair any drywall damage, and use a level to snap a chalk line as your guide. Pre-mixed thinset mortar and grout simplify the process, no special mixing required. Budget $300–$800 in materials for a 40–60 square-foot backsplash, plus your time (or $500–$1200 if hiring a tile installer). Proper grout sealing afterward keeps moisture from damaging the wall behind.
Layout and Workflow Optimization
A poorly planned kitchen layout wastes steps and frustration daily. Before moving anything, understand the classic kitchen work triangle: the path between your refrigerator, stove, and sink. Distances between these three points should ideally range from 4–9 feet each. If your kitchen is cramped, prioritize the fridge-to-sink distance (where prep and cleanup happen) as the most critical link.
In galley kitchens (two parallel runs of cabinets), narrow aisles are the main pain point. If widening walls isn’t possible, consider shifting an appliance placement. Relocating your refrigerator often means running new water and electrical lines (a job for a licensed electrician), but moving the microwave or creating a secondary prep sink in an island might solve workflow issues cheaply.
Open shelving or removing a soffit (that boxed-in space above cabinets) makes compact kitchens feel larger and more functional. A soffit removal requires checking what’s above (plumbing, electrical, HVAC ducts) to ensure it’s safe. This is structural work, hire a contractor to assess before committing. Islands add counter space and storage, but only if you can maintain at least 36 inches of clearance on all sides for comfortable movement. A properly designed island with seating, a sink, or cooktop transforms a cramped kitchen into a social hub.
Modern Appliance Selections and Integration
Today’s appliances prioritize efficiency and clean aesthetics. Stainless steel remains standard, but black stainless and integrated panels (where cabinet fronts hide the appliance) are growing in 2026. A refrigerator with matching cabinet paneling can save a kitchen from looking like a showroom: custom panels cost $200–$500 and mount directly to the fridge’s exterior.
When replacing appliances, measure your openings carefully. Nominal (named) sizes, like a “30-inch” range, often measure 29.5–29.75 inches actually, leaving room for installation. Induction cooktops are energy-efficient and cool faster than traditional electric, though they require induction-compatible cookware. Convection ovens bake and roast more evenly than standard ovens, justifying the higher cost if you bake regularly.
Energy Star ratings cut long-term utility costs: the yellow EnergyGuide labels show annual operating costs, helping you compare models beyond the sticker price. Quiet dishwashers (under 45 decibels) won’t drown out conversation. Smart appliances (WiFi-enabled fridges, ovens with app control) are nice but add $500–$1500 to the price, evaluate whether the features genuinely serve your daily routine. Most DIYers can handle refrigerator and dishwasher installation themselves (basic electrical outlet and water line connection), but gas range installation and cooktop venting almost always require a licensed professional for code compliance and warranty protection.
Color, Texture, and Design Trends for 2026
Neutral cabinetry remains practical, whites, soft grays, and warm creams are forgiving and pair with any countertop or backsplash trend. But 2026 embraces accent colors: deep forest green, navy blue, or even charcoal for one wall or a kitchen island. These colors work best on lower cabinets or islands where they anchor the space without overwhelming. Pair bold cabinet colors with simple hardware (black or brass) and let the color do the talking.
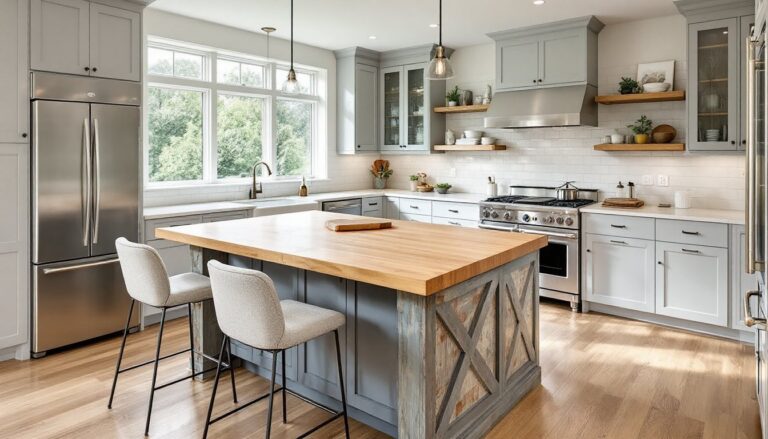
Natural textures are trending hard. Matte finishes on paint and hardware replace glossy, shiny surfaces. Wood tones, walnut, oak, and engineered wood veneers, add warmth to otherwise cool, minimalist kitchens. A wood island paired with white upper cabinets creates visual balance. Concrete countertops, weathered shiplap, and exposed brick (if your kitchen opens to another room) bring authenticity without fussiness.
Texture in backsplashes matters too. Subway tiles can be oriented in a running bond (traditional brick pattern) or a herringbone layout for visual interest. 3D tiles, textured ceramic, or natural stone add depth. The trend away from uniform perfection means slightly irregular, handmade-looking tiles are having a moment. Lighting your textured surfaces properly with under-cabinet strips or pendant lights makes the details shine. Consider the modern home renovation ideas trending this year when selecting finishes that will feel current beyond 2026.
Storage Solutions and Functional Design
Storage is often the make-or-break element in kitchen comfort. Before buying new cabinets, audit what you actually own and use. Drawer dividers, pull-out shelves (retrofit-able into existing cabinets for $50–$150 per shelf), and tiered shelving maximize vertical space. Lazy Susans are dated: tiered corner shelves or pull-out drawers in corner cabinets solve the “dead zone” problem far better.
Pantries, walk-in, pull-out, or even a narrow open shelving wall, are worth the remodel investment. If floor space is tight, a pull-out pantry cabinet (similar to a trash bin pullout but deeper) slides neatly beside your refrigerator and holds dry goods, oils, and small appliances. Shelving inside should be adjustable: fixed shelves force you to store items in awkward heights.
Drawer depth matters in hidden ways. Utensil drawers, spice racks, and base cabinets with drawers instead of door-and-shelf combos speed up cooking and cleanup. Deep drawers under the cooktop store pots and sheet pans: shallow drawers near the sink keep frequently used cooking utensils within arm’s reach. Open shelving above counters works beautifully when styled with matching dishware, glasses, or cookbooks, but it requires discipline. Dust settles quickly, and clutter shows immediately. Reserve open shelving for items you actually use and love to look at. Resources like 10 Easy Ways to Remodel Your Kitchen and 55 Kitchen Remodeling Ideas on a Budget detail specific storage hacks that maximize every inch. You can also find kitchen-specific design wisdom at The Kitchn for real-world storage solutions that balance form and function.
Making Your Remodel Real
The best kitchen remodels balance what you love to look at with what actually works for your lifestyle. Start by pinpointing your biggest pain point, is it outdated finishes, poor workflow, or lack of storage? Tackle that first, then layer in cosmetic updates. A phased approach spreads costs across time and lets you live in your kitchen between projects, learning what works. Measure twice, prep surfaces thoroughly, and don’t skip the details like sealing grout or letting paint cure fully. Your future self, cooking dinner on a regular Tuesday night, will thank you.